Mr.
Hook's Digital Art Tutorials: Photoshop - Back to Basics
© 2010 Joel A.
Hoekstra
Photoshop - Back to Basics
| What follows is a step-by-step tutorial for how to crop and blend photos in Photoshop. This tutorial assumes that you have little or no experience with the Photoshop program, but want to get started wowing your friends and family with some simple photo collage/blending. Photoshop is an expensive graphics manipulation program with a fairly steep learning curve, but it should only take a few hours of playing with the program tools before you can learn how to produce your own desktop wallpapers and calendar-ready artwork. Like most artistic endeavors, practice is the first step toward perfection. But the first thing you need to think about is Resolution of your image BEFORE you start working on it: |
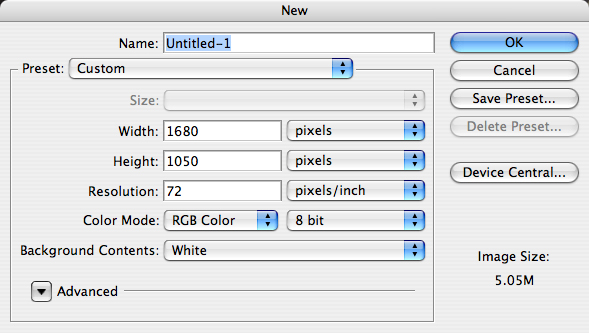 |
Whenever you create a new image in Photoshop, this sort of dialogue window will pop up asking you how large you want it to be. The main thing to take into consideration is what you plan on doing with the final image: are you going to publish this on the web (email it to friends) or are you going to make prints (a poster to frame or hang on your wall)? If your image is destined for the internet, you should measure your image in pixels and set the Resolution to 72 pixels-per-inch. 72 ppi is pretty much the universal setting for computer monitor displays and internet browsers. Most digital cameras use 72 ppi as a default setting. Making the resolution any lager than 72 ppi for a picture that will be viewed via computer monitor is usually a waste of file space. On the other hand, if you plan to make prints, you probably want to measure the picture in inches and set the Resolution to a bare minimum of 150 pixels-per-inch. At the architectural firm I work for, we save all of our illustrations a 200 ppi since most of our printouts are only 11x17 inches. You can blow up a 200 ppi image to poster-size without noticeable pixelation/distortion. The industry standard for comic books, magazines, brochures, etc. is 300 ppi. Anything over 300 ppi is a higher resolution than the human eye can discern, so unless you're making a large movie poster or a mural, there's no good reason for setting the resolution any higher than that. To find out the resolution of an image you've opened in Photoshop, go to Image > Image Size to bring up the size info dialogue box. |
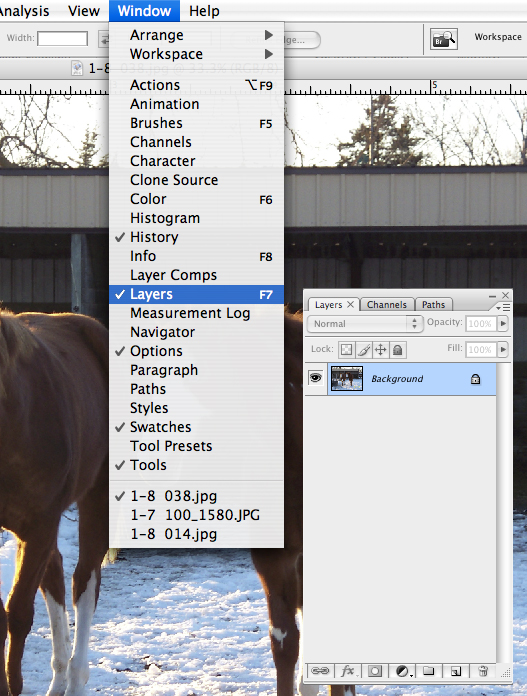 |
| Whatever size you've chosen for your picture, you also need to be mindful of the Layers palette since we plan to do some cutting and pasting. If your Layer palette isn't already on display when you open Photoshop, go to Window > Layers and make sure there is a check mark next to the word Layers. By default, new Photoshop documents have a Background layer. You'll notice there is a tiny padlock icon on the far right of the Background layer I've highlighted in the Layers palette. The Background layer is "locked" so that you can't accidentally drag it or move it around. Once you have the Layers palette on display, move it to the side of your screen so it doesn't obscure your picture while you're trying to work. |
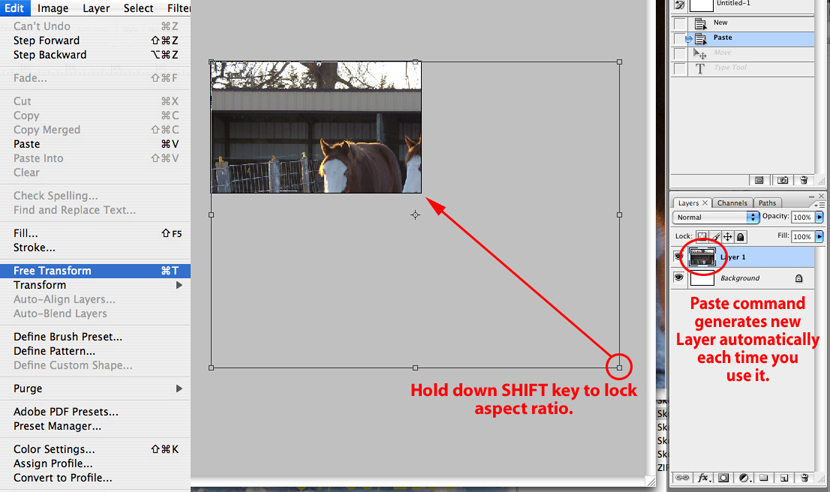 |
So you've opened up a photo that you want to paste into your new picture. Use the Select > All command or use the Marquee tool to select the bits of the photo you want to copy. Use Edit > Copy to copy your selection, click on the picture window for your new file and Edit > Paste to insert the photo. The photo may be larger or smaller than the picture window you created. If the photo goes outside the edges of your window frame, you will have to zoom out (View > Zoom Out) and then use the Edit > Free Transform function to highlight the edges of the photo with a bounding box. I you can't see all four edges, you'll have to zoom out further. While the Free Transform function is in effect, you can use your mouse/cursor to grab the corners or sides of your photo and move it toward the visible portion of your window in order to shrink it down. If you don't hold down the Shift key while your 're dragging the edges of the bounding box around, you'll squeeze and stretch the photo every which way. Holding down the Shift key will lock the photo's aspect ratio, but if you forget and accidentally stretch the photo all wonky, you can hit the Shift key at any time while the Free Transform is active or hit the Esc key to escape to your normal edit window. Once you've resized the photo to the desired proportion using the Free Transform function, hit the Enter/Return key to "apply" the transformation. You'll also notice that each time you paste a selection into your picture frame, Photoshop automatically generates a corresponding layer for the pasted selection. If you suddenly can't affect the portion of a picture you're trying to manipulate, it's usually because you have the wrong layer selected. Whatever tools you use (paintbrush, eraser, clone stamp, etc.), you will only affect the layer which is selected in the Layers palette. I keep my Layers palette open at all times while I'm using Photoshop just to keep track of where I'm at in the layer structure. Layer > Merge Down will merge a selected layer with the the layer underneath it in the Layer order. Layer > Flatten will merge all the layers together into one background layer, but this is a drastic measure of last resort. Any file you save with multiple layers will create a Photoshop Document (PSD) by default. Any layers you have saved in your PSD file will still be there when you open it back up again, and the more layers you save, the larger the file size will be. Any JPGs (internet ready) images you create from Photoshop will be flattened images, and any images you download from the internet or off of a digital camera will contain only one flattened layer. The point being: don't "flatten" the image unless you really mean it or don't plan to edit the picture anymore. Learn the Layers palette you will, young Padawan, if the mastery of Photoshop you desire. |
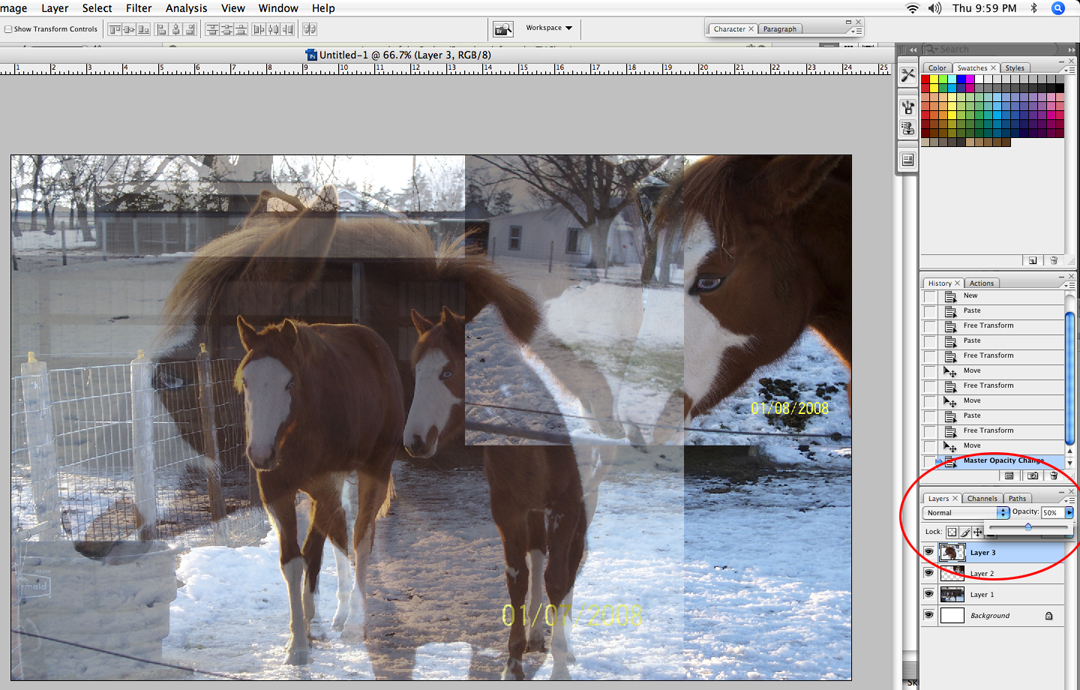 |
So here I have three resized photos in my view window, three corresponding layers in the Layers palette, and a blank white Background layer. You'll notice in the upper right corner of the Layers palette is an Opacity slider. You can adjust the opacity of each layer individually. When I'm doing a photo collage I usually find it easier to decide how to crop and size my photos if I make the layers on top semi-transparent so I can see how they correspond to the images on the layers beneath. I've decided to keep a large photo of the horses in the background (Layer 1) and to overlay a smaller picture of a horse's head in the top layer (Layer 3). Turning the Opacity of the top layer down to %50 allows me to see through the horses mane in Layer 3 all the way down to the horses standing next to each other in Layer 1. The picture of the horses nuzzling each other in Layer 2 to has been Free Transformed to a smaller size and moved off to the side for now. I plan to do some fancy cropping to that Layer later on, but for now I want to focus on getting rid of the time stamps on the individual photos. You can also see in this screen capture that I like to keep my History/Undo palette open as well. That way I can skip back to various stages of undo since Photoshop keeps a running tally of every tool or function that I use. But be wary of how many undos you can store in the History palette. By default you can only store about 25 functions in Photoshop's temporary memory. Especially when using the paint tool, you can run out of undos in the History palette pretty quick. If you store all of your brushstrokes on a separate layer, however, at least you can tweak the layer without worrying about disfiguring the original photo or sketch underneath. |
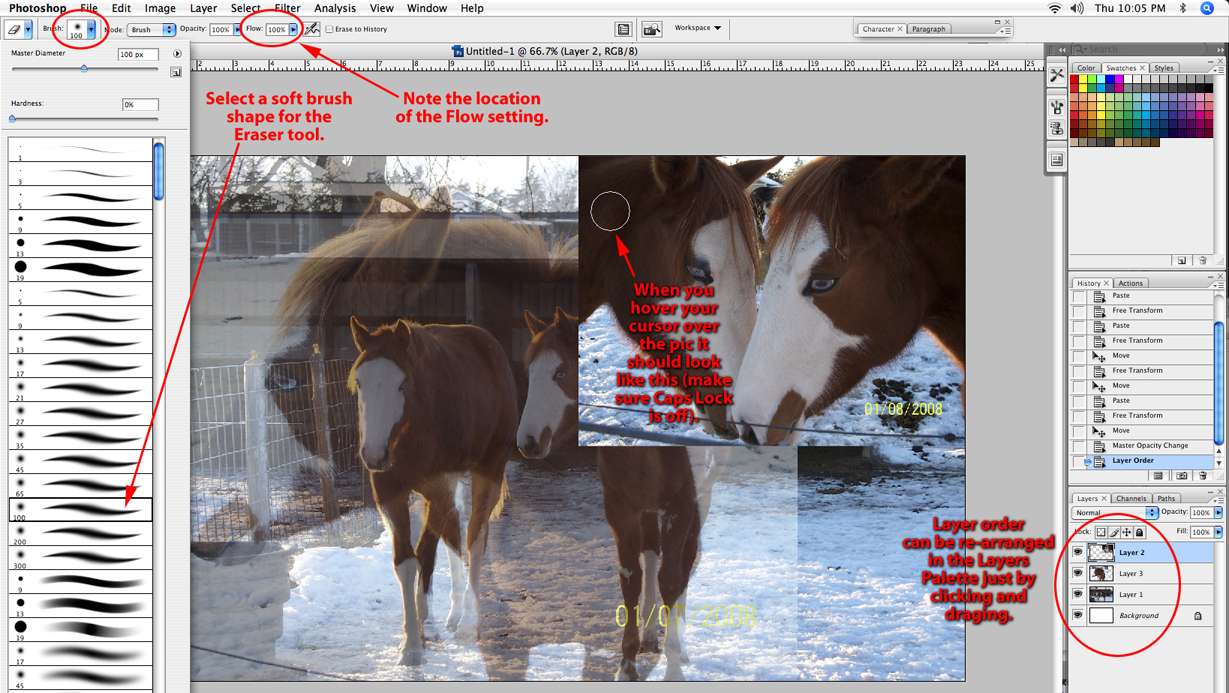 |
Did you ever notice that your Eraser tool has a brush setting? It may sound strange, but while you have your Eraser tool selected you can assign the eraser a brush shape. The brush shapes are conveniently hidden in a pull down menu right next to the selected tool icon in the upper left hand corner of Photoshop's view frame. My goal right now is to erase the time stamps on the photos in the upper layers, so I'm going to pick a large soft brush shape (in this case 100 pixels wide) and then my cursor will appear as a circular shape indicating the relative size of the brush. Note the location of the Eraser's Flow setting next to the Mode and Opacity menus on the upper left. Once you learn what the Flow setting does you'll be adjusting and readjusting it non-stop for all your painting and erasing needs. I've also rearranged the layer order in my Layers palette. All I had to do was click and drag Layer 2 above Layer 3 and let go of the mouse button. Since Layer 2 is highlighted, if I pressed my mouse button while the Eraser tool is selected, I would erase a chunk out of Layer 2. But I want to work on Layer 3 first, so I'll just click on Layer 3 in the Layers palette to highlight the layer I want to work in. Always remember: a happy Photoshop Artist is one who manages their layers wisely and practices Layer Awareness at all times (i.e. there is no such thing as a happy Photoshop Artist). |
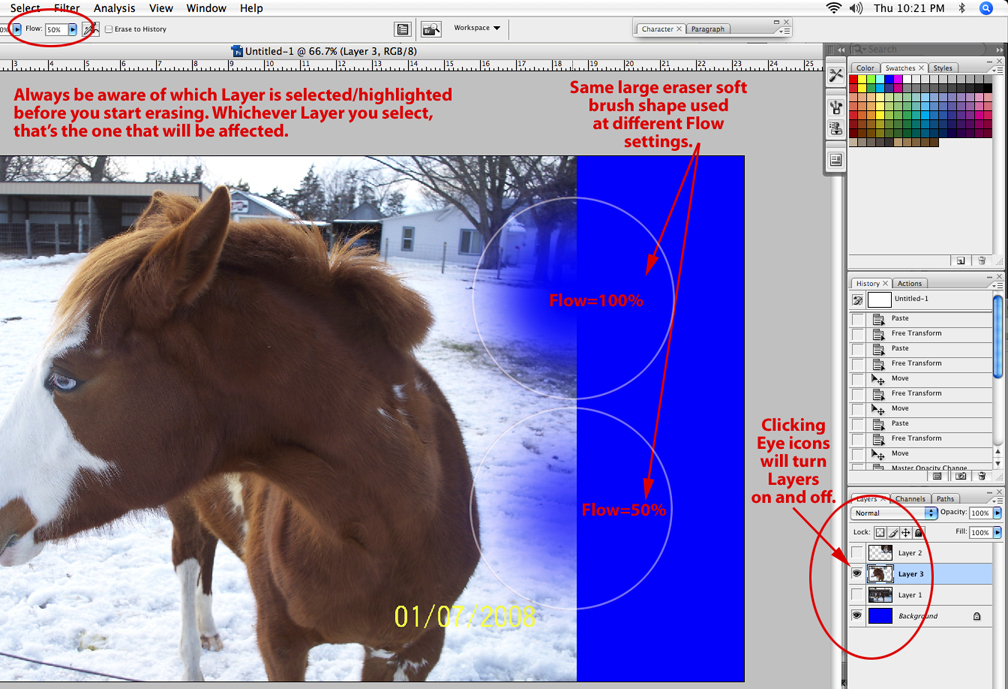 |
| I dumped a blue color on the Background layer (selected a blue color and used the Bucket/Fill tool) just to better illustrate the use of the same large soft eraser shape on different Flow settings. I turned the opacity of Layer 3 back up to %100 so you can see how much blue shows through the image after I've tapped the Eraser tool a couple of times in Layer 3. Obviously, the higher the flow setting, the more color is allowed to bleed through since a low flow setting erases less of the picture. Whenever you want a smooth blend between photos, you should probably pass your mouse/cursor back and forth over the portion you want to erase on a low flow setting so you can erase portions of the picture in stages. When I erased the time stamp off of the photo in Layer 3, I did it while the Layer was at %50 opacity (just like before) with the background photo turned on just so I could see what the finished product would look like. Turning the layers on and off is as simple as clicking the "Eye" icons on the left side of the Layers palette. |
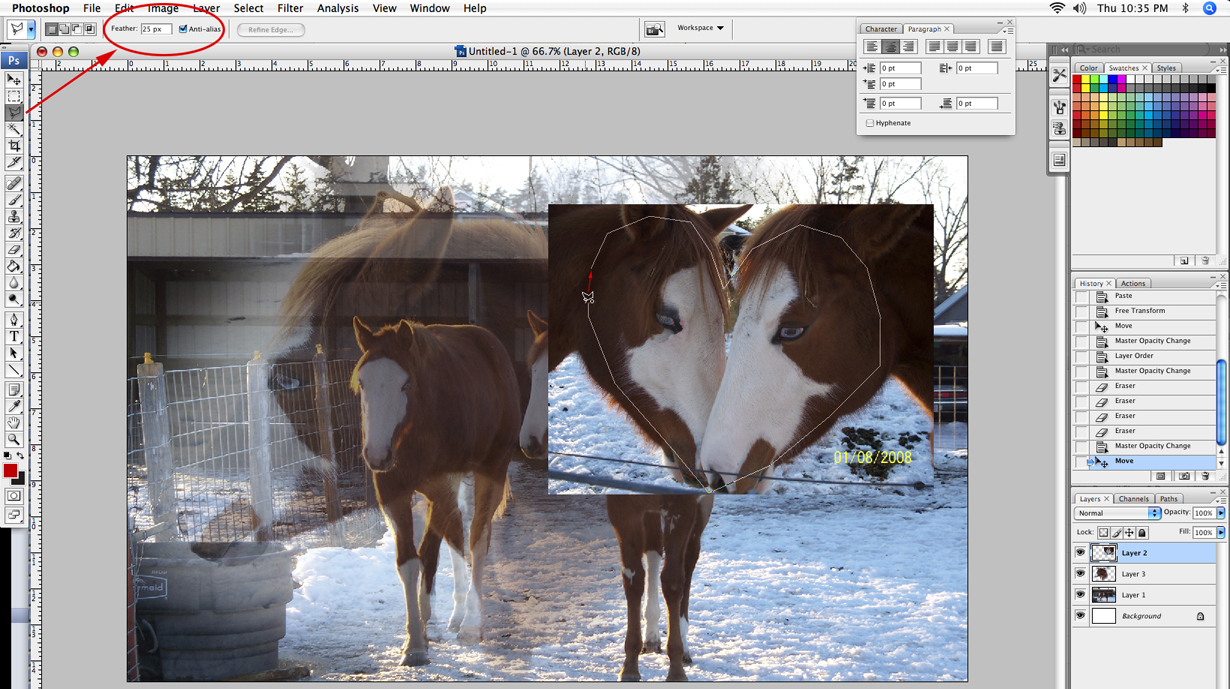 |
| Now I'm going to show you a neat little trick with the lasso tool. I almost always use the "Polygonal" lasso tool for making marquee selections. Some people avoid it because the mask can leave sharp corners if you don't click often enough along the clipping path. However, if you mess with the "Feather" setting on the lasso tool, the lasso will attempt to select a range of pixels inside and outside marquee path. In short, it gives you a "fuzzy" edge to your selection. What I've done in Layer 2 is drawn a polygonal lasso around the horses' heads in the shape of a heart with the Feather setting adjusted to 25 pixels. Then I inverted the selection and deleted the outside corners of the picture as shown below: |
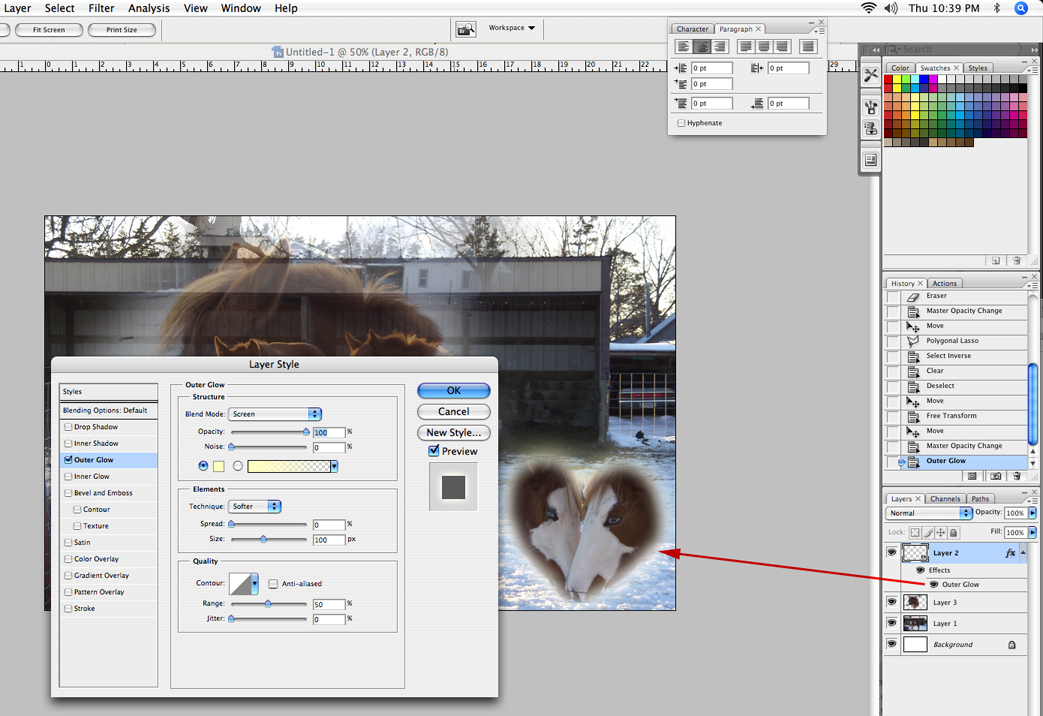 |
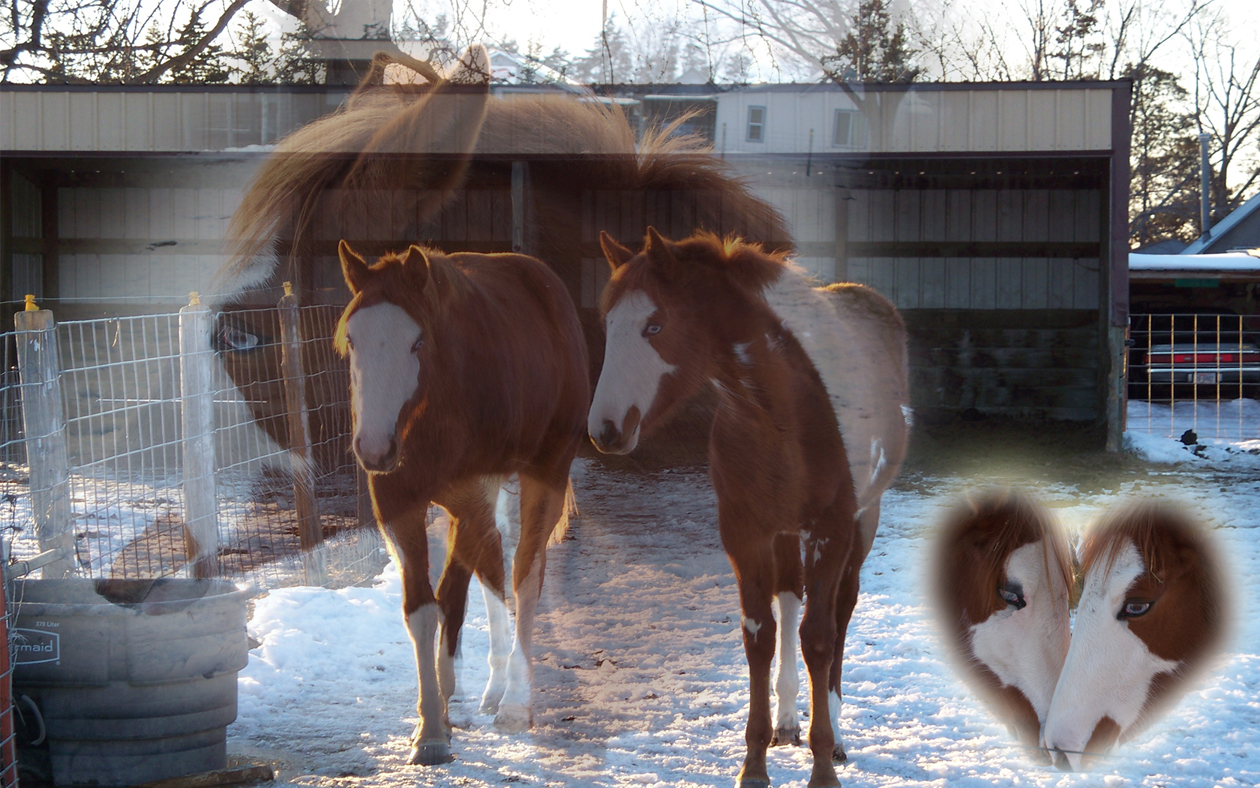
| So now I've sized the fuzzy heart shape down (after I Deselected the marquee), but it wasn't showing up against the background the way I wanted, so I gave the entire layer an Outer Glow Style. As you can see here, there are all sorts of styles to choose from in the Layer > Layer Style drop down menu. Outer Glow and Drop Shadow are probably the ones I use the most. By default, the Outer Glow layer style is set on a bright yellow color, but you can quickly and easily change that color by clicking on the color box. In this instance, I thought bright yellow worked just fine since I was trying to contrast the fuzzy heart shape against a blue background. The final photo-blended pic is shown below: |
 |
These basic Photoshop manipulation techniques have proved useful to me over time. I still use the large soft eraser on a low flow setting on an almost daily basis. Keeping track of what's going on in your Layers palette gets easier with practice, and there are hot-keys for most of the Photoshop tools noted in the pull-down menus. Control/Command-J will duplicate the currently selected layer, probably the hot-key I use the most often which isn't listed in the pull down menus. If you are planning to output a JPG, you might want to save your layered PSD file seperately (under a different name) before you "flatten" the image and Save As a JPG file (some versions of Photoshop even have a "Save for Web & Devices" option which can optimise the image copmression). Please let me know if you found this tutorial helpful (or confusing). You can email me at: misterhook@mail.com |