© 2007 Joel A. Hoekstra
|
(WARNING! - Certain stages of
this his tutorial may contain
bare nekkid Amazons! Proceed at your own risk.) |
|
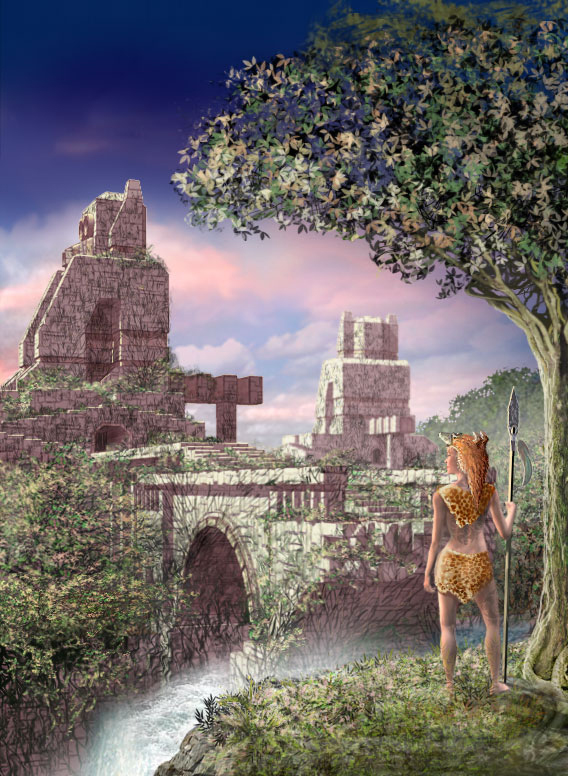
What follows is a step-by-step tutorial for how I created the most frequently viewed digital piece in my Epilogue Gallery: Lost City of the Amazons. Herein you will learn how to create customized Photoshop paint brushes in order to paint leafy foliage, how to generate a rainbow effect using built-in Photoshop tools and filters, and how to integrate SketchUp and Poser models into a Photoshop scene. The versions of the software I used at the time: Photoshop 7, SketchUp 5, & Poser 5. The Lost City of the Amazons |
| From Start to Finish |
|
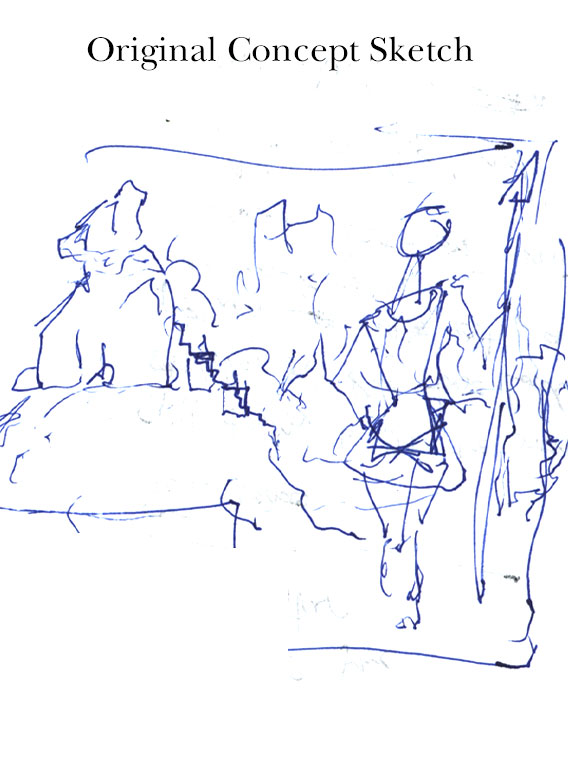
Right now the only good place to put a waterfall is in the lower left portion of the picture. I’m not sure what will lie behind the waterfall - maybe cliffs, maybe steps leading up to the ruins - I haven’t made up my mind at this point. I do know that the woman in the foreground should be wearing a very short skirt (for some reason this is very important to me). I also want there to be a second Stone Temple Daggit way off in the distance, but facing away from the city. The temple guardians should be facing unknown dangers outside their inner sanctum (rather than facing inwards). Knowing that these ruins will have to be drawn in perspective gives me ample reason to model them in 3D, and so I turn to one of my nearest and dearest new friends: Google SketchUp. |
|
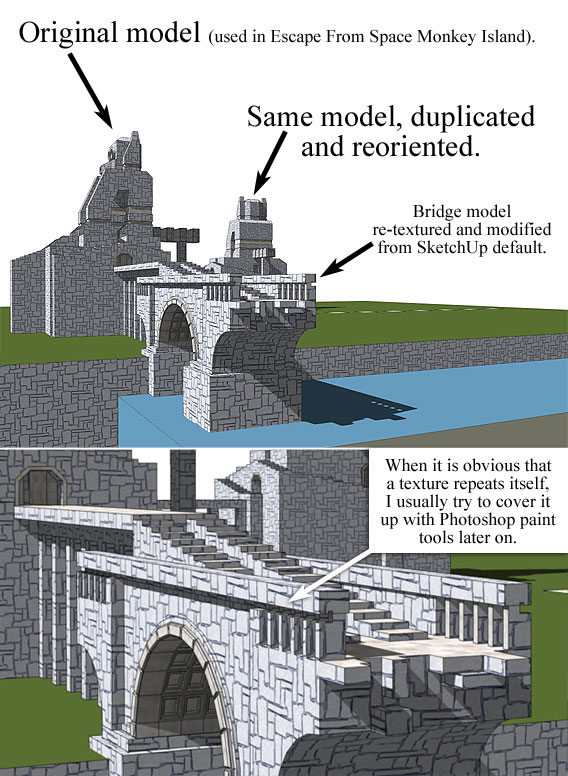
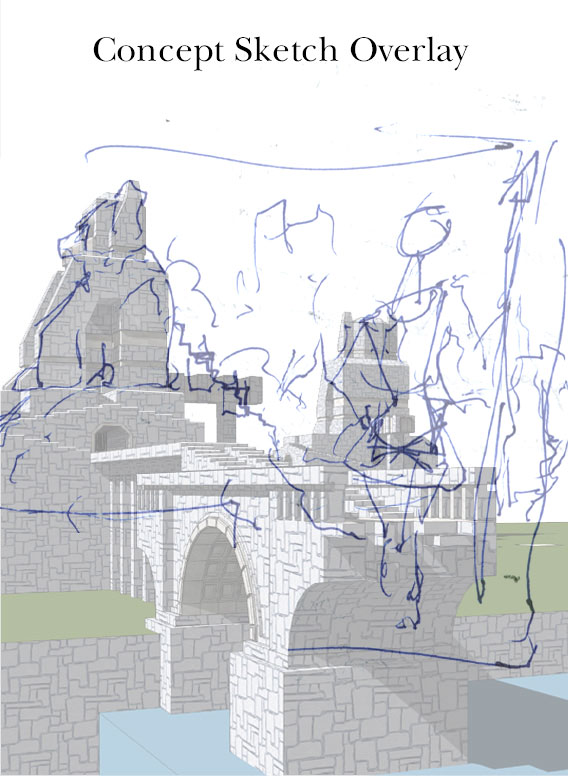
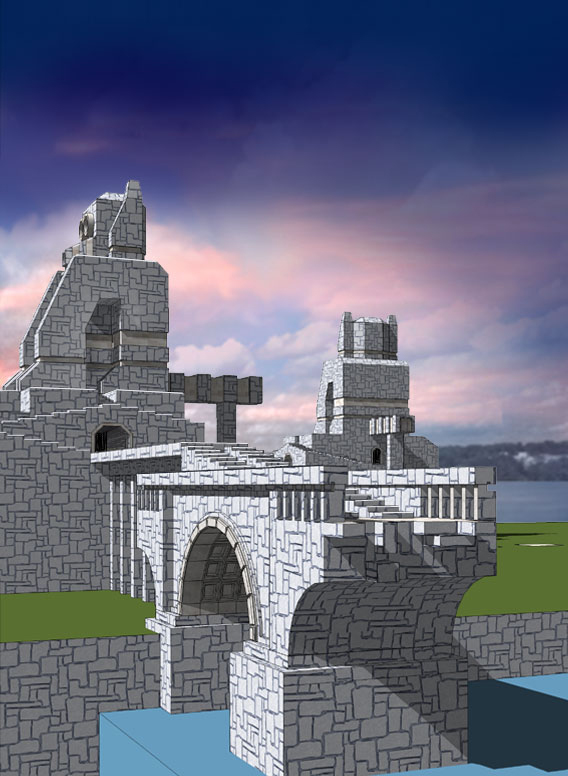
I love SketchUp! I love it so much I may even marry it some day! I’ve worked with 3D Studio Max and other top notch rendering packages, but none have had the simplicity or elegance of the 3D modeling interface that is SketchUp! SketchUp is not a particularly good (or complicated) rendering program, but it is far and away the quickest and easiest-to-learn 3D modeler I have ever used! Here is my “final” render using the SketchUp program: |
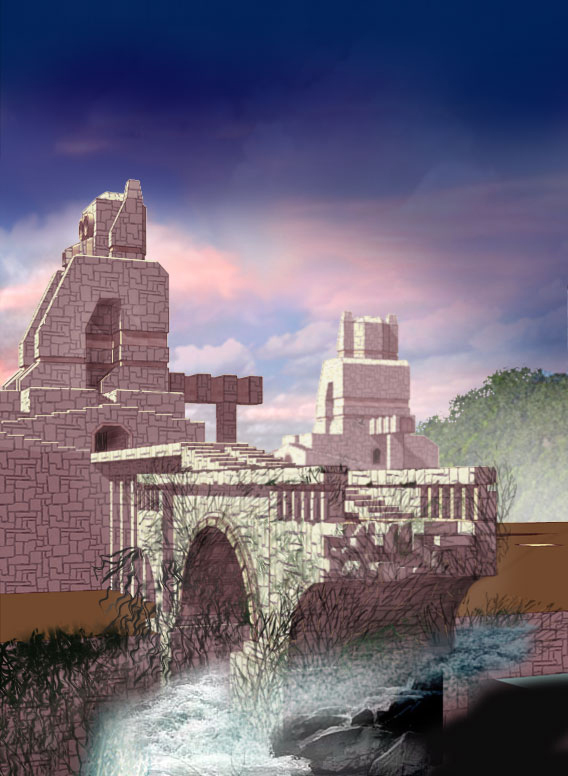
 What you see before you is a nearly raw SketchUp render with only a few edges retraced in Photoshop. Notice that all of the shadows are completely uniform - no gradations, no nuances of any kind within the shadows. We’ll have to fix that later. But look at the pretty stone texture - all drawn to scale and wrapping around objects provocatively! That’s a stock texture that came with the SketchUp program. And so did the model of the bridge! I wasn’t really planning to put a bridge in this picture, but come to think of it, a broken bridge in the middle of the river would help to explain why the city has been lost for so long. Plus the bridge conveniently blocks our view of the rest of the city. Brilliant! More importantly, I was able to copy and paste a second version of the original Stone Temple Daggit into the background without having to remodel the whole thing. After that task was accomplished, all I had to do was reorient the model and pick a new viewpoint. Picking your viewpoint is one of the most crucial first steps in almost any illustration project, and the miracle that is SketchUp allows you to finesse the angle and the point-of-view before you lock yourself in to a particular perspective. So now I don’t have to lie awake at night and wonder if the temple in the background is to scale or if it’s drawn in the correct perspective –SketchUp draws those angles for me! But the unexpected addition of the bridge does throw a bit of a wrench into the works… |
 Now that I have the two temple mounts laid out in the correct perspective and all, I can’t very well follow through with my plan to make the luscious lady in the foreground the focal point of the picture. She’d loom like a giant over the ruins and cover up almost the entire temple complex in the background. As much as I was looking forward to painting a large female derriere in foreground, sometimes sacrifices have to be made for the greater good. This damsel will have to occupy the lower right portion of the picture plane from now on. (I’m sure she won’t mind. She is an Amazon, after all. She’s her own boss!) |
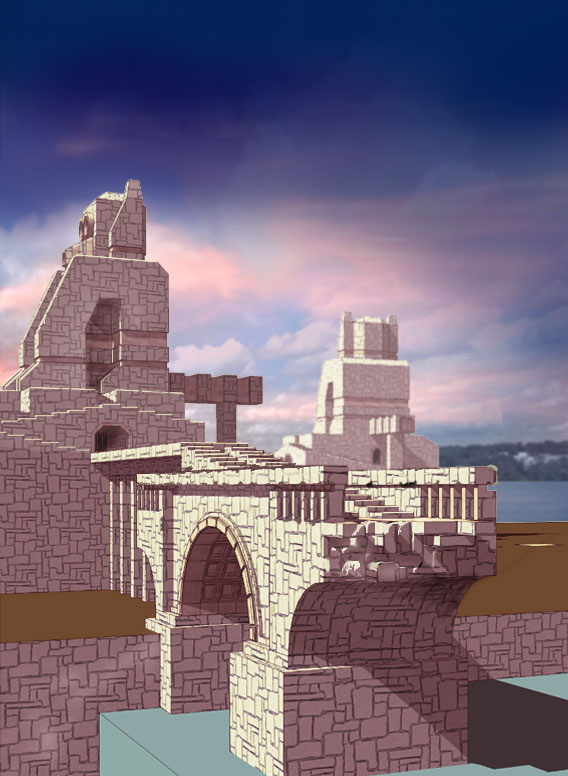
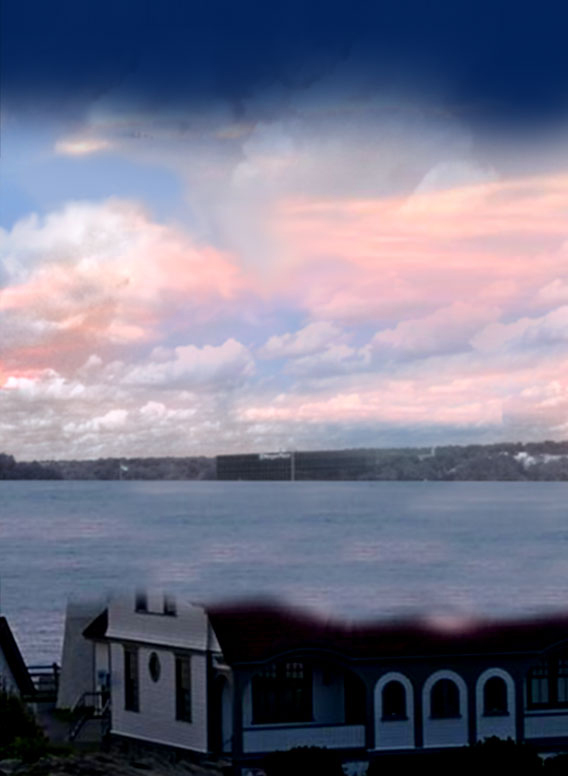 For some reason I always envisioned pink clouds in the background. I knew from the outset that I wanted to see clouds seared by the gleaming pink of a morning sun. I don’t know why. But I do know that I didn’t want to spray paint the pink using Photoshop tools. I wanted honest-to-goodness photographic pink. The kind of pink no one could possibly object to because I would be borrowing it directly from nature’s palette. Plus I was too lazy to paint the sky from scratch. So, I combined a couple of different sky photos - one I got off an internet search and one I took myself with a digital cameral right outside my office window. I put a blue, cloudy sky on the bottom with semi-transparent layers of pink-ness on top. I don’t remember why I cloned the water over top of the lighthouse. It must have seemed like a good idea at the time… |
 Ah, so that’s why I wanted to see the waterline in the background - to make sure that the clouds were situated on the exact same horizon line inherent in the SketchUp render. Probably more trouble than it was worth, but I did want to be sure that the clouds near the horizon were markedly smaller/further away than the clouds on top. This is also the stage at which I took a large soft airbrush tool (in Photoshop) and started painting large swaths of dark blue near the top of the picture. Since this illustration is going to be used as a book cover, I needed to leave lots of room for a lengthy book title near the top. |
|
Since
the ruins are in a separate
layer on top of the clouds, it’s simply a mater of adding
magentas and yellows
in the Color Balance window to liven the ruins up a bit. The sun
projects pure
white light, but cloud cover can also reflect colors onto their
surroundings. I
also did a Select > |
|
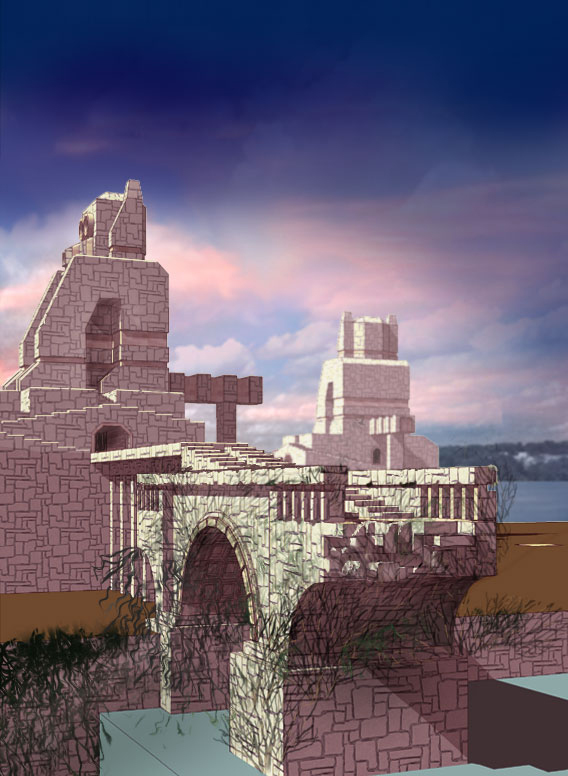
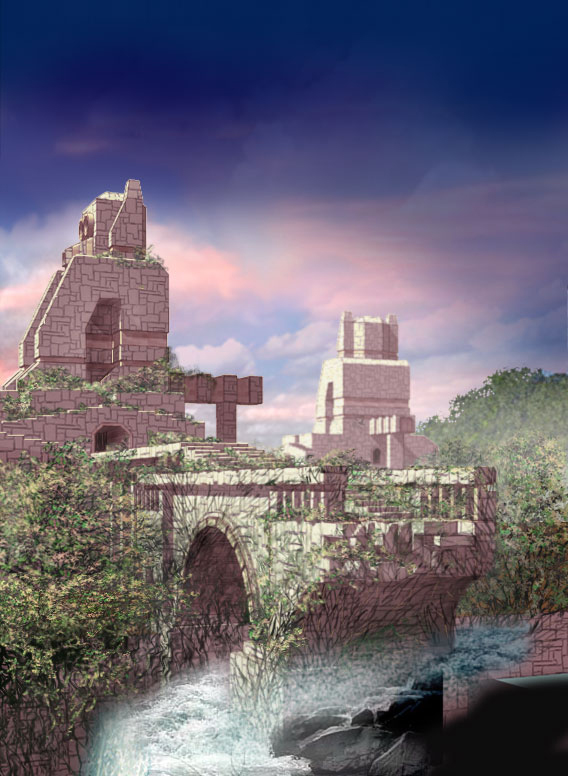
Ruins just aren’t ruiny enough without an overgrowth of vines sprouting everywhere. In separate layers on top, I’m simply taking one set of barren green-colored tree branches and mangling them with a variety of distortion filters (probably Wave and Ripple effects) and using the Edit > Free Transform tool to stretch and weave them together. The layers are also semitransparent so that they don’t cover up too much of the brick texture underneath. Layers are our fiends, and not just the sort of fair-weather friends who never invite you around to tea, but life-long buddies who you will cherish for the rest of your life. Layers are what make digital work so much more fun than trying to work and rework paint onto a canvas. Typically I’ll have 20 to 50 layers in my original PSD files when all is said and done. Labeling your layers as you create them can save you the headache of searching for specific layers later on. In this instance, I “merged down” the upper layers(via Control+E) into to two separate layers which I decided to call “undergrowth” and “vines of mine.” |
|
See, I told you there was going to be a waterfall! This layer is a photo of some rocky rapids that have mostly been erased away with some additional color and shading added on top. I also had to make the water “turn the corner” as it falls off the edge of the cliff. There is also some clone stamping taking place here. If Layers are your fiends, Photoshop’s clone stamper is your BEST friend! The Clone Stamp Tool is easily the most powerful editing too ever created in the history of photo manipulation devices. But more about that later… |
|
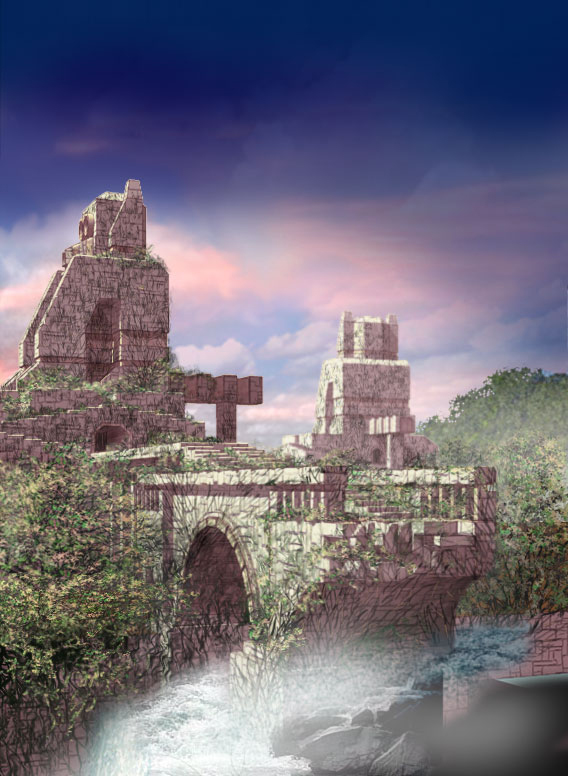
I wanted it to look like the lost city was stuck in the middle of a jungle, so I had to get rid of the shoreline in the background. This cluster of vegetation has been overlaid with some airbrushed white mist in keeping with my initial attempt to create some atmospheric perspective. I should also mention that the foliage is tucked behind the stone temple render layer on top of the pink cloud layer. I don’t mean to give the impression that I worked in all these layers in clear-cut stages. As I work, I’m constantly turning layers off and on, adjusting their opacities and tinkering with their brightness and contrast to see what works best. Layers are good like that. |
|
These trees were made with a combination of customized Photoshop brushes and clone stamping functions. I’ll be describing the brush customization process in greater detail later on, but for now notice that I’m adding yellow and pink highlights to the tree leafs to match the highlighting on the ruins. Without the matching highlights, the trees would not comfortably “settle” into the picture as much and would have a tendency to look pasted on. There is definitely a huge amount of clone stamping going on with the stamper set on a low “flow” setting and a soft edged brush shape. But the really cool clone stamping features are yet to come… |
|
The foreground vines were looking OK, but the Stone Temple Daggits were beginning to look too pristine in comparison. So here’s where the clone stamper came in the handiest. I took one tiny set of faded green tree branches and overlaid it on top of the stone temple on the left. Then I took the Clone Stamp Tool and using that same low-flow, soft-shaped brush, began to lightly stamp the bits and pieces of the same vine pattern all over the statue. The vine pattern on the temple to the right is the exact same pattern only on a different layer with a more transparent opacity setting. And what would have taken me hours to do by hand only took me a few minutes of delicately tapping my Wacom Tablet! For the uninitiated: to use the Clone Stamp Tool, start by clicking on the area you wish to clone while holding down the Alt key. This paints your “target” for the clone stamper. Then move your cursor over to where you wish to duplicate the targeted area. Now hold down your mouse clicker in earnest and whatever part of the picture you previously targeted for cloning will magically reappear in the precisely the same shape and size that you picked for the cloning stamp. What even some veteran clone stampers don’t realize is that you can also clone from one layer to another and even select clone targets in separate windows in Photoshop. The versatility of the Clone Stamp Tool CANNOT be overstated! So if you haven’t already, learn the ways of the Clone Stamp Tool you ng Padawan, and the Force WILL be with you. Always! Also note the additional layer of mist I airbrushed over the waterfall. You know what that means – time to contrast the waterfall with some nice dark foreground elements! |
|
After pulling a couple of reference photos off of the internet, I was able to finagle this nice little rock formation and tree trunk texture into the foreground. As you can see, the top of the tree was cropped off in the photo so I had to create my own branches up top. Those squiggles may not look like much now, but I’m about to plaster leaves over top of them, so here’s where things really start to get complicated: |
|
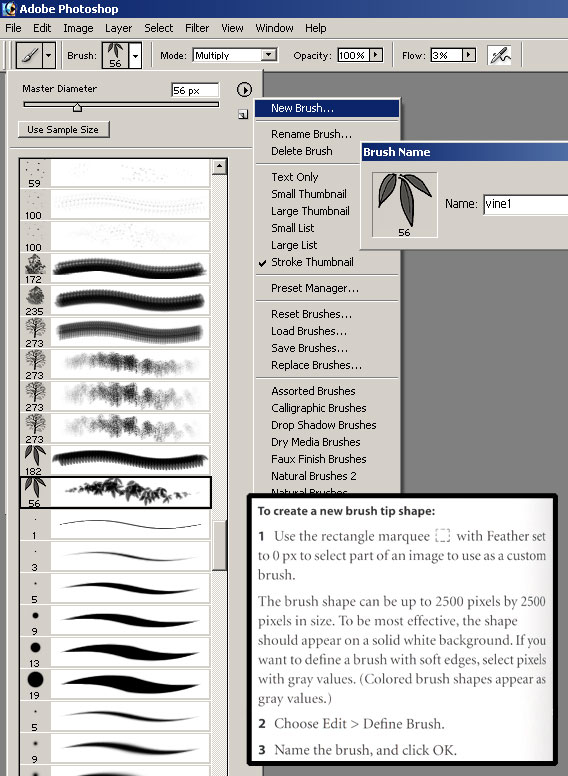
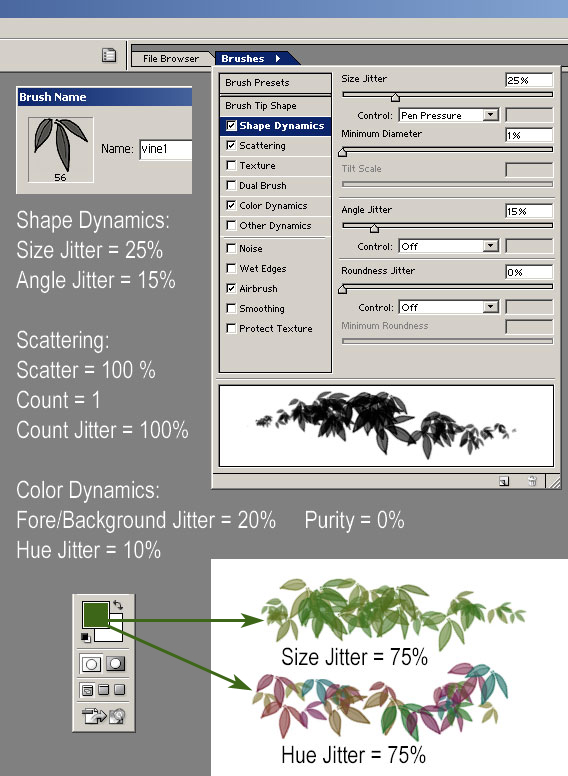
Over the years I’ve built up my own library of customized Photoshop brushes. Ever since Photoshop 7, brush sets have been ridiculously easy to create on your own. You can even save your brush sets and port them to other computers. In my line of work (architectural illustration) I have to paint a lot of trees and landscaping shrubbery. One of my most reliable mainstays is “vine1”- my all purpose leaf brush. In the “Brush Name” window you can see the single three-leaf shape I originally used to create the brush. If you are so inclined to make a similar brush, you can follow the instructions I lifted from the Photoshop manual and copy / paste the leaf image right out of the Brush Name window in this picture if you like (though you would want to create a white background and eliminate the number “56” from the pic - just make your image size 56 pixels square and you’re good to go). As you can see in the upper potion of this pic, I have also created “starfield” brushes and “forest” brushes for previous projects. You can use pretty much any shape you like to create new brushes in Photoshop, any shape that you think bears multiple repetition is fair game. But picking the brush shape is only the beginning of your journey… |
|
After you have your brush shape, you can now decide how that shape will express itself when you actually press down on the mouse button. As you can see, there are six different brush dynamics for you to play with. This brush only tweaks three dynamics: Shape, Scattering, and Color. I’ve listed all the different dynamic parameters that I set for this particular brush. On the lower right, I’ve provided a couple brush stroke examples using the same dull green color to illustrate what impact tweaking the brush dynamics can have on just one brush stroke. The most important dynamics for this particular brush are the Angle Jitter and the Scatter / Count Jitter. These brush parameters define how often the brush shape will be repeated, how far apart they will be scattered, and varies the angles at which the leaves will be positioned within the brush stoke. I don’t have any hard or fast rules for painting leaves, I just tinker with the brush dynamics until I’m happy with the end result. |
|
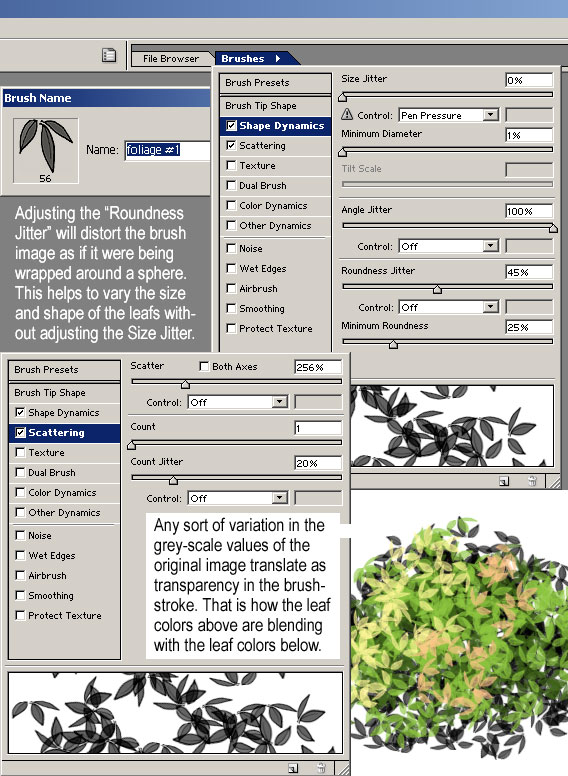
One end result I was happy with eventually became my number one foliage brush (hence the name). You can pick any brush out of your brush palate and rename while retaining the same dynamics. This brush is the same “vine1” brush with the Color Dynamics turned off and the Roundness Jitter of the Shape Dynamics turned up to 45 percent. This helps orient the leaf shapes so that it appears as if they might be pointing toward you or away from you instead of just being rotated around. The Scattering Jitter has also been pumped all the way up to 256 percent, spraying the leaf shapes much further apart than before. And I haven’t even started placing the leafs in separate layers yet… |
|
So here there are actually several different layers of leafs. Straight black in back, dark to light greens in the middle, salmon to pink leafs after that, and pale yellow highlights on top. Originally there were at least four different layers of leafs with four different colors using the same “foliage #1” leaf scattering brush in each layer. I’ve been so spoiled by customized Photoshop brushes that I can’t imagine ever having to paint individual leafs by hand ever again. Can you? Even the low lying ferns dotting the rock formation are just the same weed shapes repeated over and over again, twisted and turned with the Edit > Free Transform tool and overlapped until they cover the rocky outcropping. Whatever happened to that Amazon vixen that was supposed to fill most of the foreground? I'm glad you asked! |
|
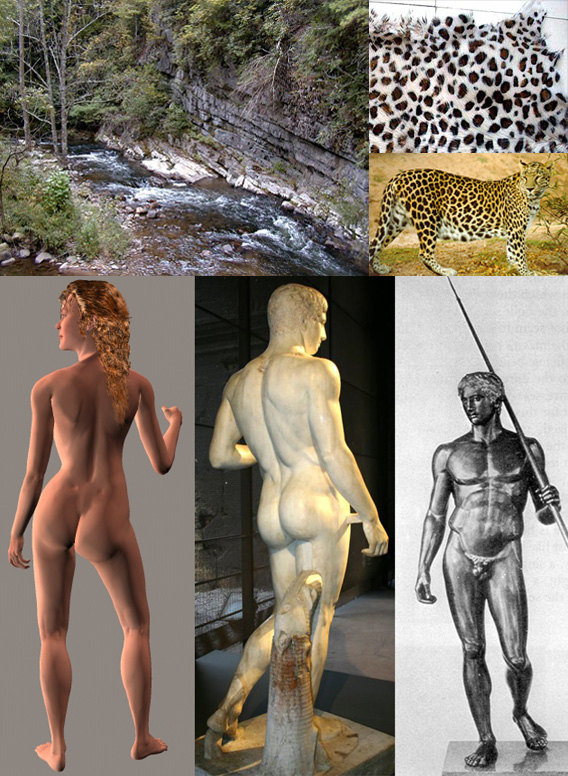
Here is a smattering of reference photos. I’m reasonably certain that bits and pieces of the river photo in the upper left were used to build the rocky outcropping in the foreground. The leopard spot collection in the upper right-hand corner should come in handy later (you’ll just have to trust me on this). The female form in the lower left is the raw Poser 5 render of our lovely Amazon princess. Rendering figures in Poser is a whole other tutorial. Suffice it to say that Poser is a poor man’s human figure modeler for those of us who can’t afford to hire real live nude models to pose for us while we sketch. It’s not a particularly flexible rendering package, but it does let you change the color and positioning of the lights which provides for nice volumetric core shadows and highlights, plus it helps you adjust the skin tones to your liking. Poser comes with several preset figure poses for standing, sitting, walking, etc. But you really need to know a thing or two about human anatomy in order to tweak the poses and still have them look relaxed and natural looking. I know that our Amazon gal will have to be holding a spear (just to show that she’s a member of the warrior class), but why try to reinvent a such a pose when I know that umpteen hundred years ago ancient Greek sculptors already did their homework on human figures bearing spears? In fact, I’m pretty sure the sculpture on the lower right is actually called “The Spear Bearer” and was posed prim and proper for just such an occasion. The lower middle figure is a Roman marble replica of the bronze Greek statue on the right, which neatly provides a similar stance to compare to our Poser figure. The main difference is that the “spear bearer” is actually bearing his spear, whereas our lovely Amazon lady is resting the butt of her spear on the ground. So there are adjustments to be made… |
|
|
|
Several tattoos and few subtle shadows later, our princess is beginning to settle into the picture a bit. I also did some internet research on spear heads to give the lady’s spear a tinge of authenticity, but the ceremonial feather was really just an afterthought. The shading on the spear helps to anchor the figure next to the tree, as does the cast shadow on the ground. The cast shadow has its own sordid history: First, I duplicated the layer of the lovely Amazon lady (and her spear) which I then darkened all the way down to a black silhouette via the Hue/Saturation window. Then I stretched the silhouette to fit the ground with the Edit > Free Transform tool and then made the entire layer semitransparent so that the underlying grass texture could show through the silhouette. And then I probably threw in a couple of blur filters for good measure. As complicated as that sounds, it’s still easier (at least for me) than trying to calculate where the shadows will fall by hand. |
|
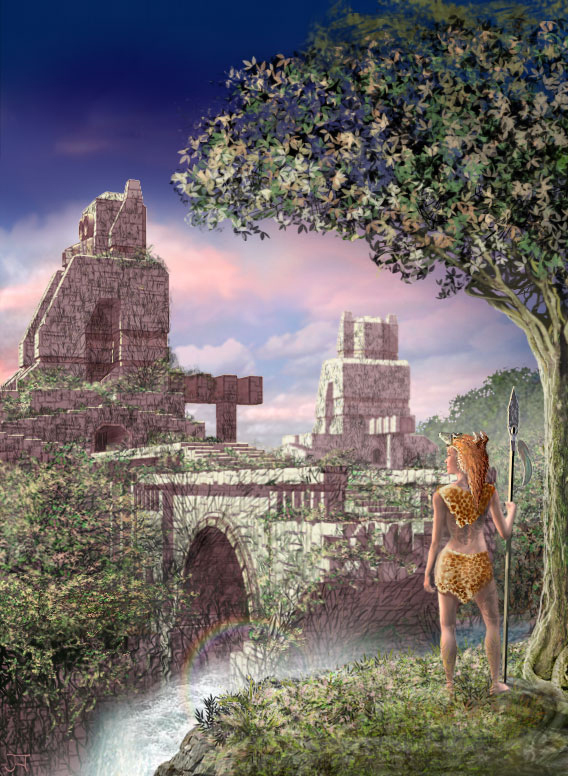
See, I told you those leopard spots would come in handy! Pretty much every pulp fiction magazine I’ve ever seen with an Amazon vixen depicted on the cover is wearing some sort of skimpy leopard-skin outfit (even when they’re on the moon). And lets face it, nothing instantaneously says “Amazon” quite like a skimpy leopard-skin outfit. Hey, I don’t make these rules up , I just follow them mindlessly. The Daggit headdress was almost as much of a pain to do as the dress. It had to be instantly recognizable to die-hard Battlestar Galactica fans and yet still look like an actual animal headdress that a woman of the wild would be willing to substitute for a pair of ear muffs. At least the bright orange fur doesn’t clash with her outfit. And then I said to myself: “Self! Don’t you see how the sun hitting the mist from the waterfall would create a totally kick-ass rainbow?” And I said to myself, “Hey, you’re right! So…how do you propose we do that…in Photoshop?” So I thought about if for a while and then I said (to myself), “Aha! I’ll use that Edit > Stroke function thingy I learned about while looking up Photoshop tips on Epilogue.net!” Much later, after my rainbow turned out even better than I thought it would, I spent the rest of the evening patting myself on the back for being so clever. In fact, I was so proud of myself, I drew this little diagram just so that you too can follow my sterling example: |
|
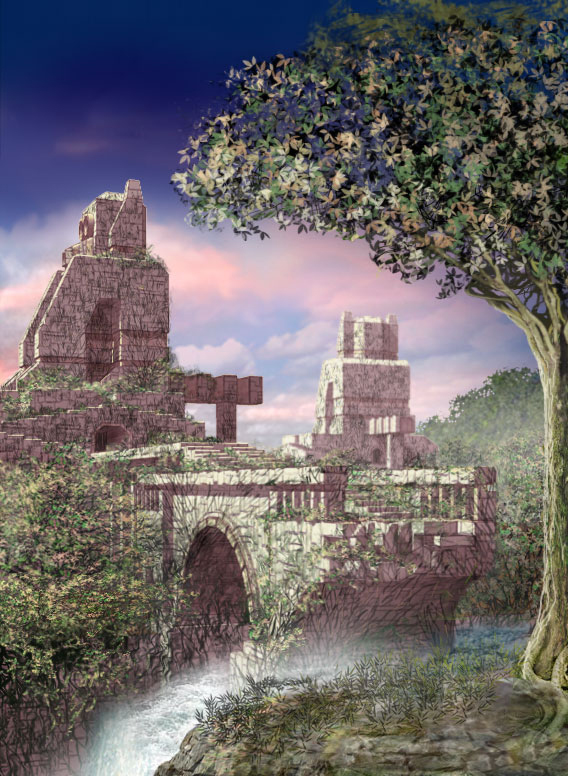
See, that wasn’t so hard after all, now was it? And here is the final result: |
|
Hey, wait, we’re not done yet! Come back here! Now’s the time to fiddle with the brightness and contrast knobs to see if we can make some final improvements before we call it a day. The Amazon’s cast shadow, for instance, is just lying flat across the tree root, it should most definitely be curved. And the colors of the leafs are a little washed out, and the rainbow would show up a little better if we re-introduced some darker darks into all the shadows and…well, wait here a minute, I’ll be right back…… *several tweaks later* Ta-da! |
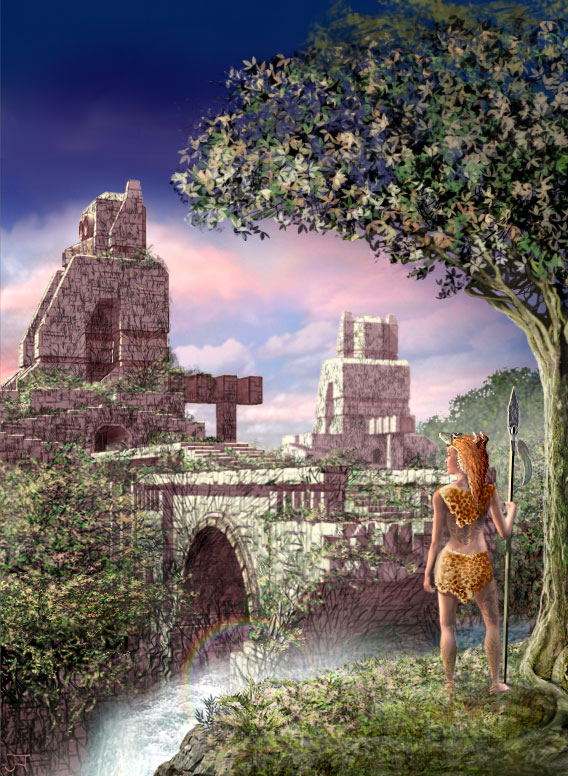 There, that’s better. Now I think we’re ready to call this one finished! So flatten it into a JPG and be done with it! Unless, of course, you want to make a Photoshop tutorial out of it, in which case those layered PSD files might come in handy someday… Well, I hope you were able to glean some useful information out of this tutorial. I certainly wish I had known about the marquee Stroke function much earlier in my career, and I also wish that the interface for creating new brushes in Photoshop was more intuitive. As the old GI Joe cartoon used to say: “Now you know, and knowing is half the battle!” Joel A. Hoekstra Architectural Illustrator September 2007 |
Back to Menu: |